Shogi is a board game for two players, often called Japanese chess. Your goal is to trap the other player's king. Its special twist: pieces you capture can return to the board on your side.
This guide uses letters on the pieces, so you can learn without reading Japanese. The diagrams and examples are adapted from my book Shogi for Chess Players.
1. The board and the goal
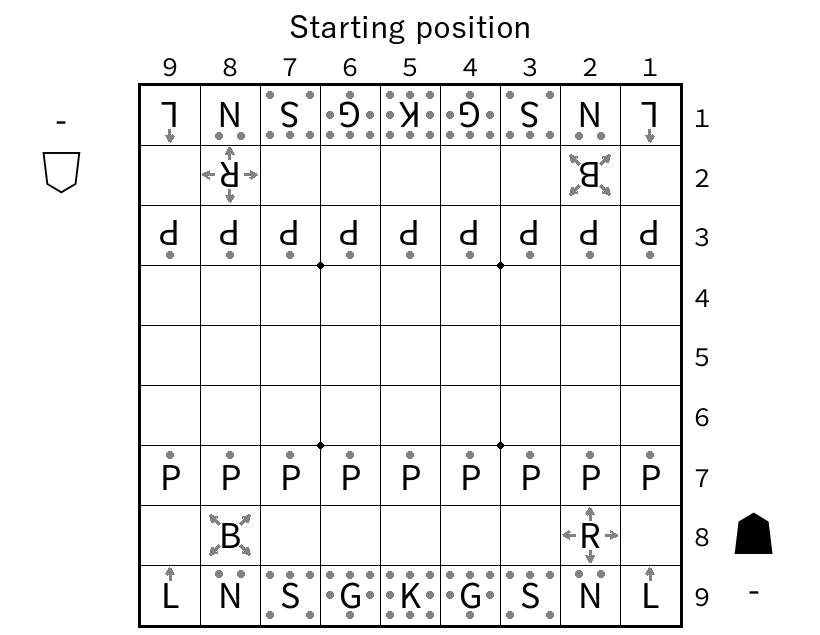
The board has 9 rows and 9 columns. Each player starts with 20 pieces. Both sides use the same pieces; the pointed end faces the opponent. In these diagrams, your pieces are upright and your opponent's letters are upside down.
Setting up a physical board
Looking from your side, put lance, knight, silver, gold, king, gold, silver, knight, lance along the nearest row. In the second row, place the bishop second from the left and the rook second from the right; leave the other squares empty. Fill the third row with nine pawns. Your opponent does the same from their side. Both players start with no pieces in hand.
In the diagrams, K means king, R rook, B bishop, G gold, S silver, N knight, L lance, and P pawn. The small gray dots and arrows are movement reminders, not extra pieces. Pieces beside the board are pieces in hand; a dash means none.
Take one turn at a time
For a casual game, agree who goes first. That player is called Black (or sente); the second player is White (or gote). These names do not refer to the color of the pieces. Players alternate turns. On your turn, either move one piece already on the board or place one captured piece onto it. You cannot pass.
Move onto an opponent's piece to capture it. Remove that piece and keep it beside the board, visible to both players. These captured pieces are your pieces in hand. You cannot move onto your own piece.
Check and checkmate
If your king could be captured on the opponent's next turn, it is in check. You must stop the attack: move the king to safety, capture the attacking piece, or block its attack when possible. You may never make a move that leaves your own king in check.
Checkmate means the king is in check and there is no legal way to escape. The player delivering checkmate wins; you do not actually capture the king. A player may also resign to concede the game.
2. How the pieces move
“Forward” means toward your opponent. It is upward for your pieces in these diagrams and downward for theirs. All pieces capture in the same way they move.
Each diagram shows one piece facing upward. Blue squares are places it can move. For the rook, bishop, and lance, the straight lines continue as far as the board allows, unless another piece blocks the way.
King (K)
One square in any direction, but never into check.
Rook (R)
Any distance vertically or horizontally.
Bishop (B)
Any distance diagonally.
Gold general (G)
One square forward, diagonally forward, sideways, or straight backward. Not diagonally backward.
Silver general (S)
One square forward or in any diagonal direction. Not sideways or straight backward.
Knight (N)
Two squares forward and one sideways in a single jump. Only two possible destinations.
Lance (L)
Any distance straight forward.
Pawn (P)
One square straight forward, including when capturing.
Only the knight can jump over pieces. A rook, bishop, or lance must stop before a friendly piece, or capture an enemy piece and stop on its square. You may move less than the maximum distance, but cannot turn a corner during a move.
Your first move
From the starting position, try moving the pawn in front of your rook one square forward into the empty square. That is a complete turn. Your opponent now makes one move. Neither player can drop a piece yet, because no pieces have been captured.
If you already play chess
The king, rook, and bishop move as in chess. The knight jumps only forward. Pawns move and capture straight forward: there is no initial double move or en passant. There is no queen and no castling move. Black plays first.
3. Promotion
Promotion changes how a piece moves for the rest of its time on the board. The three rows farthest from you are your promotion zone. When an unpromoted piece moves into, within, or out of that zone, you may promote it as part of the same turn. The king and gold cannot promote.
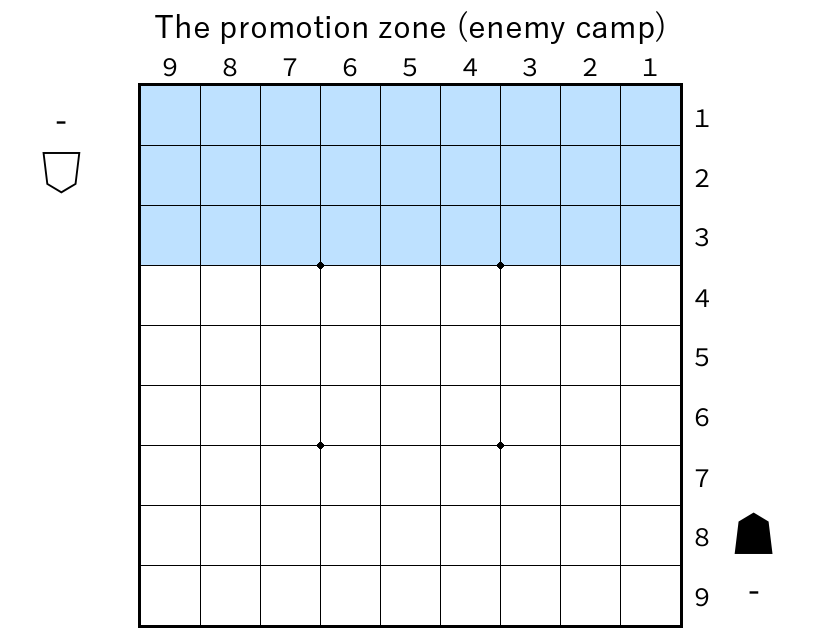
With physical pieces, turn the piece over. Here, a + before the letter marks promotion.
- Rook → dragon (+R): keeps its rook moves and gains a one-square diagonal move.
- Bishop → horse (+B): keeps its bishop moves and gains a one-square vertical or horizontal move.
- Silver, knight, lance, pawn: replace their original moves with the gold's moves. A promoted pawn is also called a tokin.
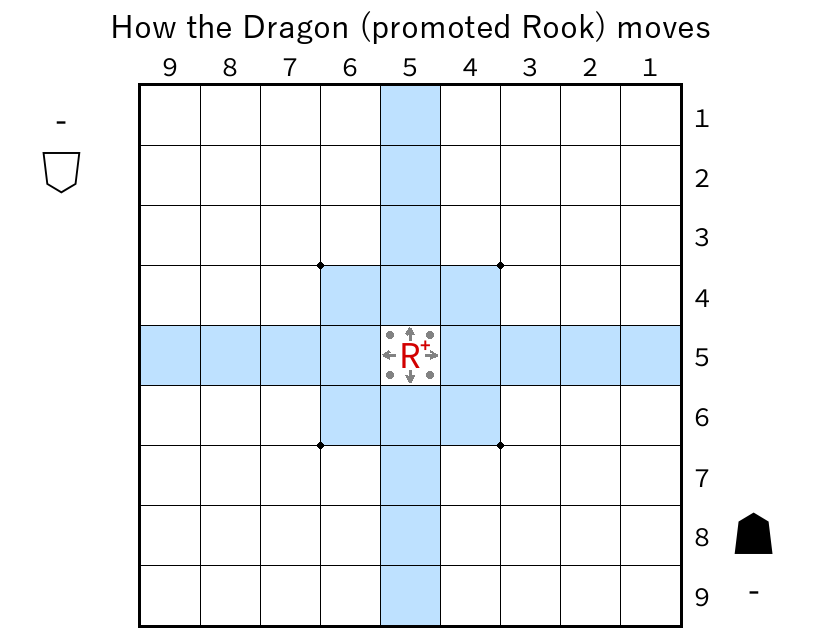
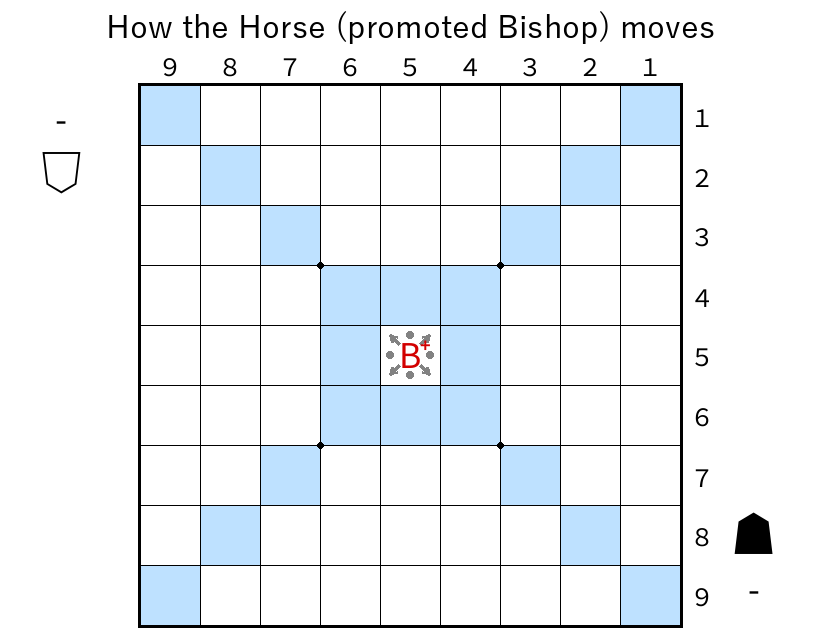
Promotion is usually optional. It is compulsory if the piece would otherwise have no future move: a pawn or lance reaching the last row, or a knight reaching either of the last two rows.
A promoted piece stays promoted while on the board, even outside the zone. It cannot promote again. If captured, it returns to its original, unpromoted form in the capturer's hand.
4. Captured pieces and drops
Instead of moving a piece, you may place one piece from your hand on an empty square, facing your opponent. This uses your whole turn and is called a drop. The piece now belongs to your side and moves normally on later turns.
A drop cannot capture anything. You always drop a piece unpromoted, even into the promotion zone. It may promote on a later move that starts or ends in that zone.
For example, suppose your rook captures an enemy silver. Keep the silver beside the board and let your opponent take their turn. On one of your later turns, you can drop that silver onto an empty square. You do not also move it on that turn. You may keep captured pieces in hand for as long as you like.
Three restrictions to remember
- No two unpromoted pawns in one column (nifu). You cannot drop a pawn in a column that already has one of your unpromoted pawns. An opponent's pawn or your own promoted pawn does not count.
- No pieces with nowhere to go. You cannot drop a pawn or lance on the last row, or a knight on either of the last two rows, relative to its forward direction.
- No immediate checkmate by dropping a pawn. A pawn drop may give check, but must not itself be checkmate. Moving a pawn already on the board to give mate is allowed. Other pieces may be dropped to give mate.
As with every move, a drop must leave your own king safe. A useful example is dropping a piece between your king and an attacking rook, bishop, or lance.
A drop that wins the game
In this small example, your silver (S) is on the board and you have a gold (G) in hand. The opposing king is at the top. Only the pieces needed for the example are shown.
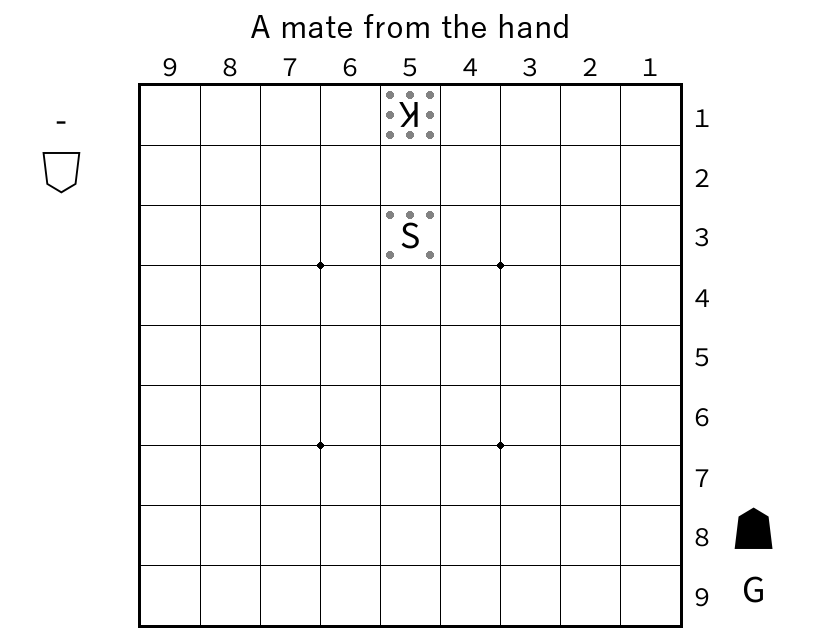
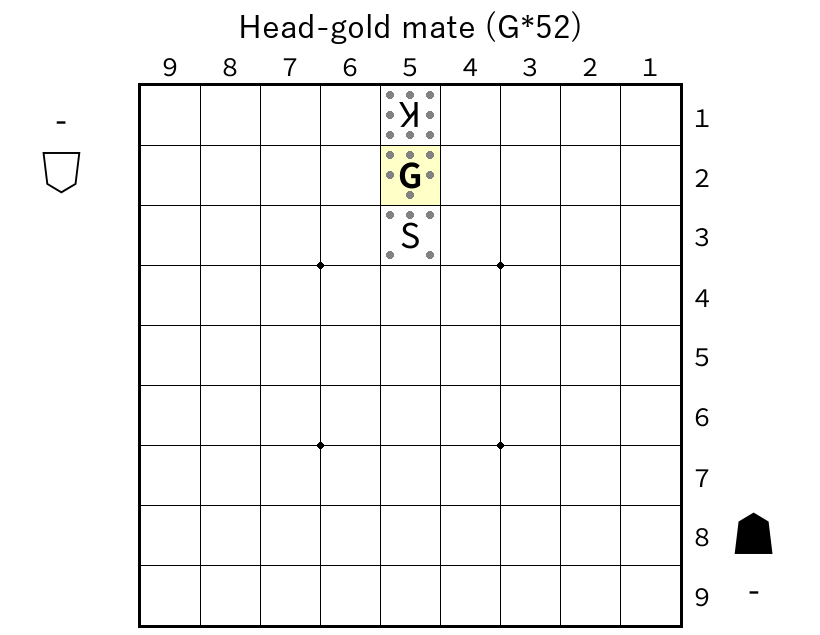
Drop the gold in the empty square directly between the silver and the king. The gold attacks the king and all four other squares it could escape to. The king cannot capture the gold because your silver protects it. There is no square between the gold and king where a piece could block the attack. This is checkmate.
What about repeated positions and other endings?
If the same position occurs four times, including the pieces in hand and whose turn it is, this is sennichite. Normally the game is replayed with the sides reversed; online handling can vary. If one player causes the repetition by checking on every turn, that player loses.
There is no chess-style stalemate draw: having no legal move is a loss. Games can also end through time limits or illegal moves. Rare positions in which both kings enter enemy territory use additional entering-king or impasse rules; follow the rules of your playing site or event.
5. Try three questions
Think through each question, then open the answer. These are practice examples, so the boards do not contain a full starting set of pieces.
Can a piece promote when leaving the zone?
Your unpromoted silver starts in the promotion zone and moves one square diagonally backward, out of it. May you promote?
Show answer: promotion
Yes. The move starts in the zone. Entering, moving within, and leaving the zone all allow promotion.
Can a promoted silver move diagonally backward?
Show answer: the promoted silver
No. It now moves like a gold. Its original movement is replaced, so it loses the silver's diagonal backward moves and gains sideways and straight backward moves.
Your king is in check. Can a drop save it?
You are the bottom player, with a silver and a pawn in hand. The opposing rook attacks your king along the bottom row. Your king has no safe square and cannot capture the rook. Which piece can you drop between them?
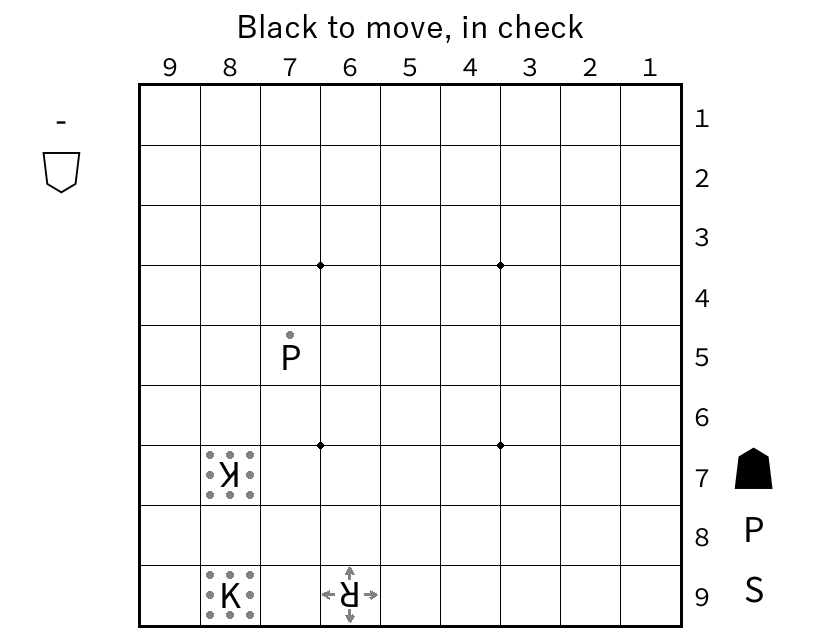
Show answer: escape the check
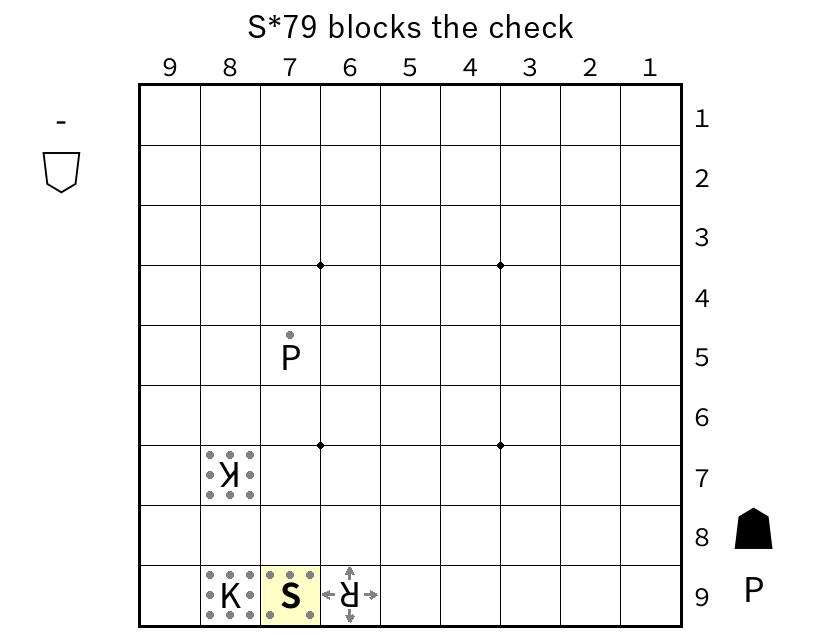
Drop the silver on 79. It blocks the rook's attack. The pawn cannot be dropped there because you already have an unpromoted pawn in column 7. Your pieces move upward in this diagram: the bottom row is not their last row. Without the other pawn in column 7, a pawn drop here would be legal.
6. Your next step
You now know the basic moves. Keep this page nearby during your first game and take your time checking where each piece can go.
Before you finish each turn
- Does my piece move this way, and is its path clear (unless it is a knight)?
- Will my king be safe after the move?
- If I move into, within, or out of the promotion zone, can or must I promote?
- If I drop a piece, is the square empty and are all three drop restrictions satisfied?